| Home | Notes | Github |
|---|
Written: 28-07-2020 (Updated: 02-09-2020)
This is a quick tutorial on how to create a website on a very small budget. You could use another method of hosting such as GitHub Pages however I was more interested in the nuts and bolts, and this method (using google cloud platform) provides that as well as less restrictions to how it’s used.
Some things you’ll need:
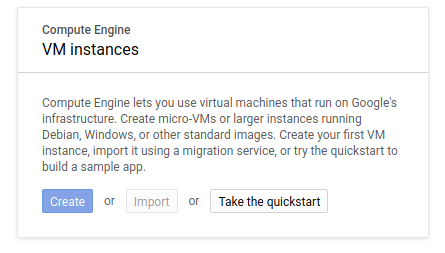
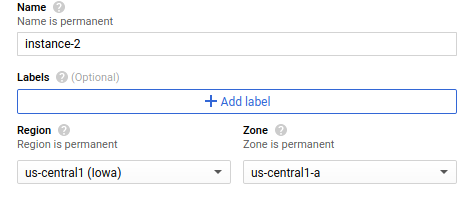
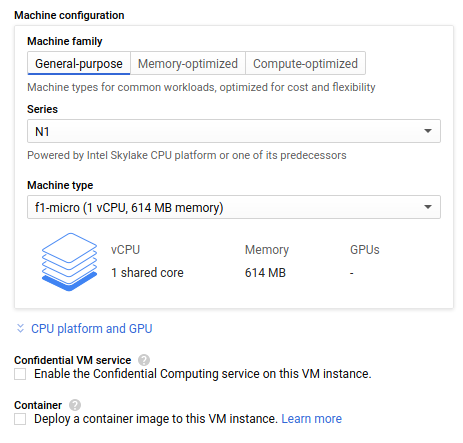
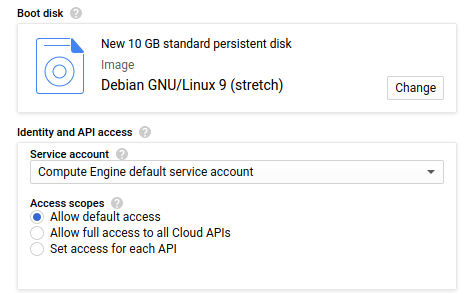
Set up Google Cloud Platform, using the free trial/free tier3. If you’re using an alternative VPS Service the goal is just to get access to it through SSH. Steps are as follows:

The thing we need a domain registrar to do is (A) Provide a domain to buy - but I’m assuming you’ve already done this- and (B) Tell the DNS where to look when someone looks up your website. This is done through DNS Records. The steps are (on hover) as follows :
A Recordwww.website.com
to website.com.
CNAMEwwwduncanwither.comThe DNS stuff seems pretty simple, there are two main types of record:
The only other interesting one is an MX record for mail servers, but I’ve not touched upon that yet.
The following is how to make subdomains (for this case for draft.website.com):
draftwebsite.comwww.draft CNAME record as well.Then you need to create a new nginx config (instructions below) with
a new folder, and server name draft.website.com
Update and upgrade for good measure, and install the required programs:
sudo apt update
sudo apt upgrade
sudo apt install nginx certbot python-certbot-nginx
Think of a fun name for your website 4,
I’m using “woobsite” here. Replace the duncanwither.com
with your website name.
sudo cp /etc/nginx/sites-available/default /etc/nginx/sites-available/woobsiteThen edit the config (sudo nano /etc/.../woobsite) so it
contains info in the following information (I’ve removed the comments
for clarity):
server {
    listen 80;
    listen [::]:80;

    root /var/www/woobsite;
    index index.html index.htm index.nginx-debian.html;

    server_name duncanwither.com www.duncanwither.com;

    location / {
        try_files $uri $uri/ =404;
    }
}
Link the config you’ve just written to the nginx enabled directory so it knows what to look for.
ln -s /etc/nginx/sites-available/cabin /etc/nginx/sites-enabled/Now make the directory for the website that was specified in the config file (and move into it):
mkdir /var/www/woobsite
cd /var/www/woobsite
This is the directory where you have your files for the website. For demonstration you can just add a basic html file (like the one below) as a placeholder:
sudo nano index.htmland add the following5, or any other html you fancy:
<h1>Website Under Construction.</h1>
<p>Thanks for stopping by.</p>
Then reload nginx so it works with the new site.
systemctl reload nginxIf this throws an error try sudo service nginx start
first.
Next to get cerbot working for https…
To ensure HTTPS you need a valid SSL certificate. To get one use certbot.
Whilst in the website folder (cd /var/www/woobsite if
not) run the following
certbot --nginxAnswer the questions as you see fit. I was:
A to Agree to Terms of Service.N to not share email.1 2 to activate HTTPS for both the websites in the
nginx config.2 to redirect HTTP to HTTPS.If it doesn’t verify and is throwing an error I found it just took some time for DNS stuff to update, so wait 15 minutes, and try certbot again.
The certificate expires after a while (not too sure how long) but add
the command certbot renew to sudo’s cron 6, and that should keep your
certificate valid.
This failed for me recently for both
www.duncanwither.com and duncanwither.com. It
would work for the non www version (and it’s cleaner). The
solution was to cert the non-www version and then redirect
the www version with a modification to the sites avalible.
Namely adding the server below: (thank you stack
overflow)
server {
    server_name  www.mydomain.com;
    return       301 http://mydomain.com$request_uri;
}There are a couple of things I do to automate the maintenance of the website. First is the monthly renew command as mentioned above. Another is to keep the system updated. To do this I’ve for a little script which I run weekly. This is very optional - as it has the chance to break your system[^bysd] - but it also keeps it more secure… hopefully:
#!/bin/bash
apt-get update
apt-get upgrade -y
apt-get autoclean

#Logging Run
echo Ran on - `date` >> /home/duncanwither/update.log
If you don’t do this I’d still recommend regularly updating the system, to keep it secure. [^bysd]: I’ve never had an update on Debian which has bricked my system, but I’ve only been running Debian derived Linux for 3 years at this point, and only had a server running for 1 year, without issue.
Update: I do not condone the following. Use scp instead.
I’ve left it here as a marker of my dubious judgement.
File delivery is something I’m not fully wrapped my head around yet but the simplest way - and the way I used for a while - is to zip up the website, and transfer it over ssh using the terminal which pops up when using the default google cloud platform ssh button.
The way I’ve found used useful to automate the website delivery using git and GitHub. I suspect there are other - possibly better - ways of doing this, but for me it was to use the tools I knew, and when you’re a hammer every problem looks like a nail. This upshot of this method is you can develop the website on your local computer, and push to a GitHub repo (which I was doing anyway) and the site will update the next day.
This method assumes:
This requires both git and rsync to be
installed:
sudo apt install git rsyncCreate a directory for the git repo and clone your website repository to it:
mkdir git_files
git clone git@GitHub.com:your_user/you_repo.git
I then use the script below (entitled update_site.sh) to
pull the repo, copy files to correct location, restart nginx 8. It’s then logged in a file for
checking later if required. Note you’ll have to change the user
(duncanwither) and copy location
(/home/duncanwither/woobsite/) to match your setup.
#!/bin/bash

# Update the git
(cd /home/duncanwither/woobsite/ && git pull)

#copy files
sudo rsync -av /home/duncanwither/woobsite/ /var/www/main-site  --exclude=.git --exclude=*.md --exclude=.gitignore

#re-start nginx
sudo systemctl reload nginx

#Logging Run to a file for later analysis.
echo Ran on - `date` >> /home/duncanwither/cron_log.log
This is then added to the users crontab (crontab -e) to
run every day at 4am:
0 4 * * * /home/duncanwither/update_site.sh >/dev/null 2>&1Now you’ve got a website, your own slice of internet, you can do as you please with it. I recommend files and stuff.
To check that your DNS changes have “taken” you can use the
nslookup command, e.g:
nslookup duncanwither.comThis will return a result for an IP for the website. This may be a cache of it (i.e. a non authoritive source). To find the authoritive source, first find it:
host -t ns duncanwither.comthis will return the authoraite name server for this site:
ns1.hover.com. then to find the authoritive IP address:
nslookup duncanwither.com ns1.hover.comsee the firewall status:
ufw status
ufw allow 'Nginx Full'
ufw allow 'Nginx HTTP'